
ahhhh.....the long awaited bathroom transformation post.
What started as a rainy day project to spruce up the out-dated tile in the girls' bathroom turned into a full on make-over.
A good friend recently commented on one of my posts, "For some reason when I read your decorating stories I think of, "If you give a mouse a cookie."" I'm 100% sure my husband would agree with that statement. I don't think there has been a single project we've started that ended when that particular project was finished. Some of it because we've been in our house less than two years and we are still making it our own, some of it because my design aesthetic has changed over the past couple years and some of it because my older girls are getting into their teenage years and want spaces that feel a little more sophisticated.
Their bathroom was the very first room I painted when we moved in this house and it was decorated with things the girls specifically wanted in their bathroom. A Paris-themed bathroom with mint green walls and white and coral accents.
Their bathroom at our previous house was a dark purple-y mauve color - a really rich color but it made the bathroom feel very dark. It was already that color when the girls and I moved in with Bill after we got married, and it was the only room in that house that we never re-painted before we sold it. So when we bought this house, their first request was: lighten up the dark green-brown bathroom.

As you can see from the picture, it wasn't hideous - but the color wasn't something little girls would want and the solid oak cabinetry went out of style a decade ago when our home was built as a model house for our neighborhood.
So we lightened it up with a little paint and called it 'good enough' - knowing it was a room we wanted to give a little more attention once we finished other projects around our house.

Fast forward two years, and Kinsey and I were looking at pictures of bathrooms and she gave me some ideas on what she'd like in their bathroom.
Have you guys seen all of the hand-painted tile that is such a hit right now?! Kinsey and I were swooning over them, and I thought, "I wonder if I could paint their dated tile?" I mean, we paint everything else: walls, cabinetry, furniture, brick...we even epoxy'ed the countertop in our master bath.
So I did a little searching and found a company that makes tile stencils. I watched a few tutorial videos on their site and was convinced I could easily give their bathroom a new look by just painting their tile. So I ordered the stencil, rollers, brushes and paint I would need to make this project a reality and then I impatiently waited for the shipment to arrive.
I wish I had taken a picture of the stencil prior to use because I did cut it into pieces to be able to do the pieces of tile that aren't a full tile, but you can view all the stencils they have available by clicking here.
Supplies I used for this project:
- Augusta Tile Stencil
- Rustoleum Chalked in Linen White
- Rustoleum Chalked in Charcoal
- 2" paint brush
- 4" dense foam roller with handle
- 1" stencil brush
- Water based Polyurethane
I cleaned the floor really well because otherwise the paint would not have adhered to the tile properly.
I brushed the first coat of paint on the tiles to make sure I got right up to the baseboards and around the toilet, tube and vanity.

Coats 2-4, I rolled on using a dense 4" foam roller. I let each coat dry for 2 hours before applying the next.
Until the floor is sealed with a poly, it will scratch easily so it's a must to wear socks and only walk on the floor when absolutely necessary.
Don't mind the captions on the next couple photos...I saved them from Snapchat.

I ordered my stencil to fit the exact size of our tiles, so all I had to do was line up the stencil with the grout lines and tape it to the floor using some blue painters tape. Don't worry, the tape does not pull the base coat up.
So that I didn't get significant bleeding under the stencil (you will get some), I off-loaded the stencil brush or roller prior to applying. To get the desired full color, I did have to let the paint dry a little bit and go over it again to build up the color.
I also did alternating tiles because the pattern overlaps to be able to line it up straight. Putting tape on a freshly painted tile would have messed the stenciling up, so I stenciled every other tile in a row and when back and stenciled the in-betweens.

At this point, I did have to cut the edge of the stencil off to be able to get it flush up against the wall and the bathtub.
From start to finish, I was able to get everything on this floor done in two days. That included applying three layers of polyurethane.

I also gave the vanity a fresh coat of white paint.
When I stood back and looked at the mint green walls against the now black and white tile, I knew I needed to give the rest of the bathroom a facelift, as well.
Give a mouse a cookie....
So I painted the walls white.

I chose Behr Maui Mist because it has a nice blue undertone to it.
When I'm picking white's, I usually gravitate towards blue undertone whites as opposed to red or yellow undertones.
If I ever decide to paint another room white, it will definitely get a coat or two of Kilz beforehand because who knew it'd take so many coats (4 to be exact!!!) to cover mint green paint. Especially when using a paint + primer.
Once I got the white on the walls, the white on the vanity was too much, so I picked Kinsey and her best friend, Jess up from Starbucks and took them with me to pick out a paint color.
I knew I wanted a blue-gray so I told them that as we were walking into the store and they settled on HGTV Home by Sherwin Williams in Nordic Blue.

My initial plan was to give it a couple coats of paint and call it a day, but in walks middle daughter, telling me she thinks I should distress the vanity.
So I let the paint dry overnight and got up the next morning and lightly distressed it.

At this point, I had decided everything in the bathroom had to be changed so I had purchased a new light fixture, faucet, shower head, mirror, outlet covers, door handles, etc.
And....the supplies to refinish the countertop with concrete.
Y'all...this may be one of my most ambitious projects yet, because I have never worked with concrete.
But honestly, it was just as easy and much quicker than applying the epoxy to the master bath countertops.
Supplies needed:
- Henry Feather Finish
- All - purpose sponges
- Trowel
- Drywall Tray
- Latex Gloves
- 2 in putty knife
- 150 and 220 sandpaper
- Electric sander (not necessary but makes the job easier)
- Acrylic concrete sealer
First things first, Bill removed the faucet and drain stopper.
I cleaned and sanded the counter top and sink.
I mixed a batch of concrete up and because I wasn't sure how much I'd need to cover the surface with the first thin layer, I ended up dumping out over half the amount I made.
This first coat looked like a hot mess and I was seriously doubting how it was going to turn out, but I knew this was the look I wanted in this bathroom, and there was no turning back at this point.
I let each layer of cement dry for several hours, then sanded, wiped the cement dust off and put another thin layer on.
All-in-all I ended up with three layers before I was happy with the coverage.

I let the final coat cure overnight and then I applied two coats of concrete sealer to the entire countertop and sink.

Once the concrete sealant cured, Bill installed the faucet, hung the mirror and changed out the light fixture.
I stained the 1 x 8 piece of lumber I picked up with the same Early American stain I used when we built the barn doors and it was a little too light so I added a layer of Jacobean over top of it.
While the board was drying, we mounted the hardware I picked up at Lowe's. I initially picked up an 8" nipple fitting, but once I put it up, I realized it stuck out a little too far, so back to Lowe's we went to exchange them for 6".
Bill cut the board into 24" pieces for me.
Supplies I used to build the shelves:
- 1 x 8 piece of Pine
- Early American and Jacobean stain
- 3/4" Floor Flange Fitting x 4
- 3/4" diameter 6" Nipple Fitting
- 3/4" Cap Fitting

We ended up using the same shower curtain we had in here before because I think it gives it a nice feminine touch with all the rustic pieces.
Linda, her sister (Jeannette) and I ran over to our favorite antique shop this afternoon to find some decor and I scored some really great pieces not only for the bathroom but also for the center piece on my kitchen table.

I love this little tray I found for the cotton ball and q-tip jars to sit on. I picked it up with the intention of sitting it on the sink but it worked better on the shelf. The other pieces were things I already had around my house so that's always a score.

Not the best quality of lighting, but the faucet, plug in and light switch covers, towel ring and light fixture were all purchased at Home Depot. All have an Oil Rubbed Bronze finish.
I initially wanted a frameless, tilt mirror but then I found this mirror and fell in love.
The South Carolina sign and candles holders were things we already had.
One thing I knew for sure was I did not want to put a generic towel bar back up on the wall opposite the sink.
Linda had a window at her house that we had discussed using to make a table for our nature area, but hadn't got around to it yet so Bill had stuck it up in the attic. I loved the idea of repurposing it into a towel rack, so I purchased a few robe hooks from Lowe's and attached them to the bottom of the window. This sucker is heavy and we didn't want to chance one of the girls pulling it down and glass shattering every where so Bill secured it to the wall by screwing 4 wood screws threw the window into studs.
And I added this wreath I found today on my shopping excursion with my MIL.

I could not be more happy with how this bathroom came together, and in only about 9 days. It would've been less than a week if we had consistently worked on it every day but I took a couple days off after I finished the flooring.
We still have a few things left to do: like paint trim and change out the shower head but I had so many emails asking about the tile and concrete countertop and costs that I wanted to get this post up.
All-in-all I spent just over $500 to transform this bathroom.
When I walk past it, I can't believe how much these easy projects transformed this space.
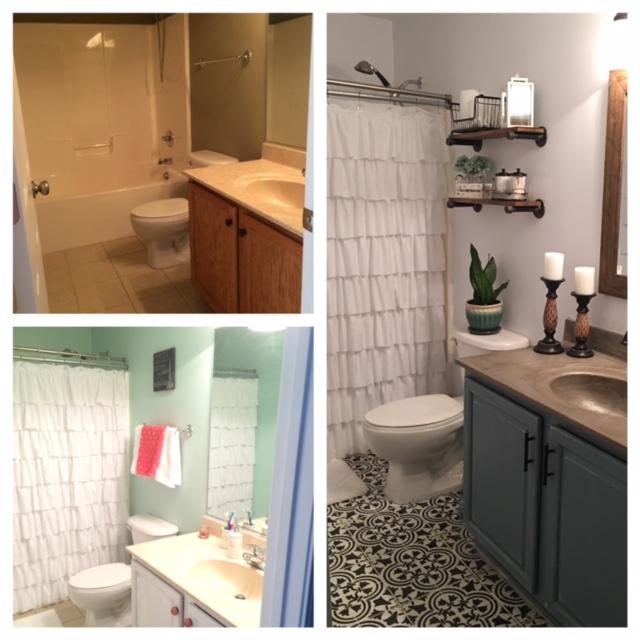
Top Left: Blank slate when we purchase our home.
Bottom Left: Cosmetic upgrade after we moved in.
Right: Today